Setup
This guide gets your WattWächter Gas onto your Wi-Fi, onto the gas meter and counting. It applies to both variants, Magnetic Field (GW-MF) and Inductive (GW-ID); where they differ, it says so.
Package contents
- 1 × WattWächter Gas – Magnetic Field
- 1 × set of adapters for mounting on the gas meter: BK adapter and universal adapter with 3M adhesive pad and screws — which one you need is shown under Meter preparation
- 1 × USB-C cable
- 1 × quick start guide
Power supply via USB-C, 5 V (min. 500 mA).
- 1 × WattWächter Gas – Inductive
- 1 × set of adapters for mounting on the gas meter: Itron adapter and universal adapter with 3M adhesive pad and screws — which one you need is shown under Meter preparation
- 1 × USB-C cable
- 1 × quick start guide
Power supply via USB-C, 5 V (min. 500 mA).
What you also need
- USB-C power supply or a spare USB-C port near the meter — plan how to get power to the meter
- Smartphone, tablet or laptop with a browser for the setup
- Wi-Fi network in the 2.4 GHz band the device will join — it cannot see 5 GHz networks. Check with your phone beforehand that your Wi-Fi reaches the meter.
Check beforehand
Check beforehand whether Magnetic Field or Inductive fits your meter: Supported meters. For steps 4 and 5 you need the current meter reading and the volume per revolution as well as the calorific value and Z-number from your gas bill.
1. Set up Wi-Fi
There are two ways to connect the WattWächter Gas to your Wi-Fi:
Option A: Via the app (recommended)
The easiest way is the WattWächter app (version 2.2 or later):


- Power the device via USB-C.
- Download the app from the App Store or Google Play and make sure Bluetooth is on and the app may use it.
- Tap "Add new device" and choose Gas.
- The app finds the device via Bluetooth (as
WWGW-XXXXXX) and guides you through Wi-Fi, mounting and the meter details — meter reading, volume per revolution, calorific value and Z-number. That also takes care of steps 2 to 5 below. - Finally, choose whether to run the WattWächter locally or link it to the cloud.
Then continue with step 6: check that it counts.
Option B: In the browser via the access point
The WattWächter Gas is set up in the browser via its own access point.
Connect to the access point
- Power the device via USB-C.
- The device opens its own Wi-Fi network:
WattWaechter-GW-XXXXXX(the X stand for the last six characters of the device ID). Connect to this network. - A captive portal should open automatically. If not, open in the browser:
http://192.168.4.1
Configure Wi-Fi
The WattWächter home page opens:
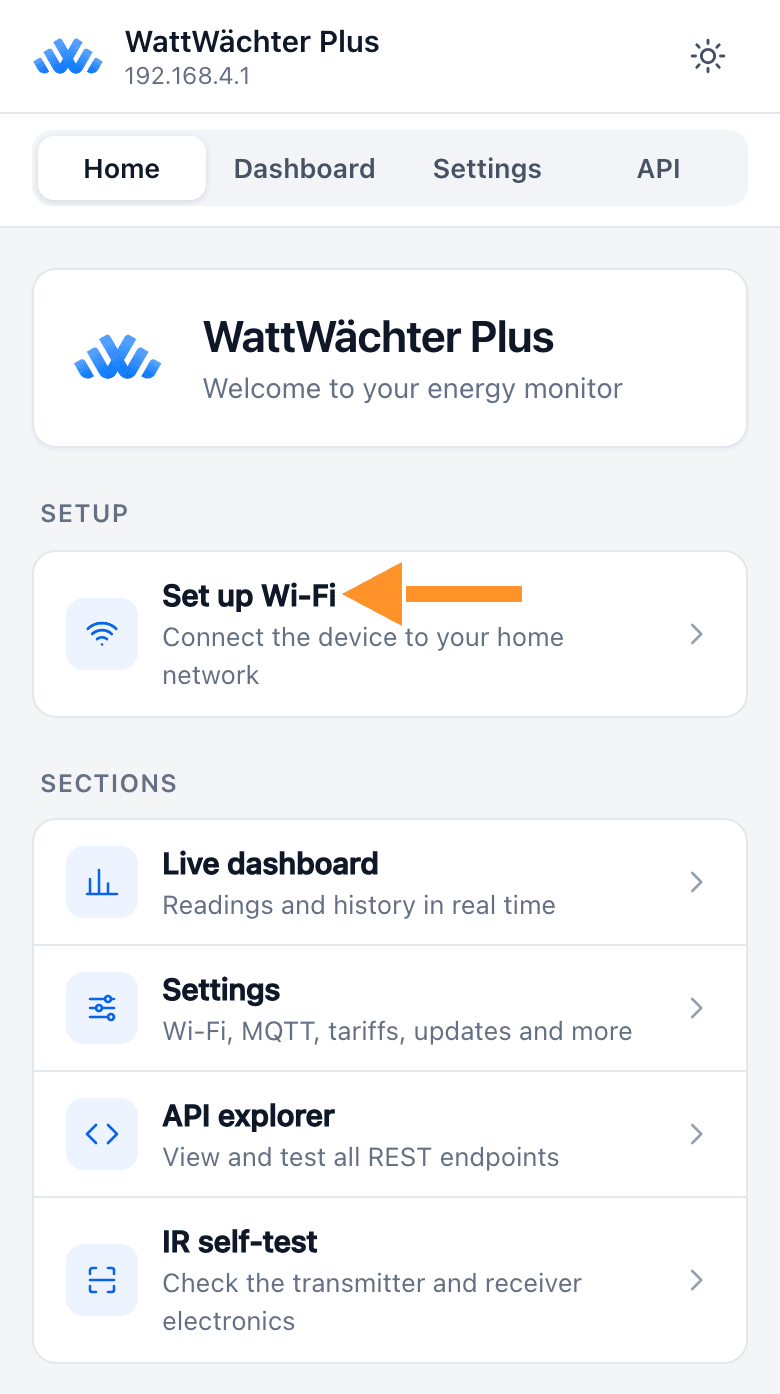
- Click "Set up Wi-Fi" in the "Setup" section
-
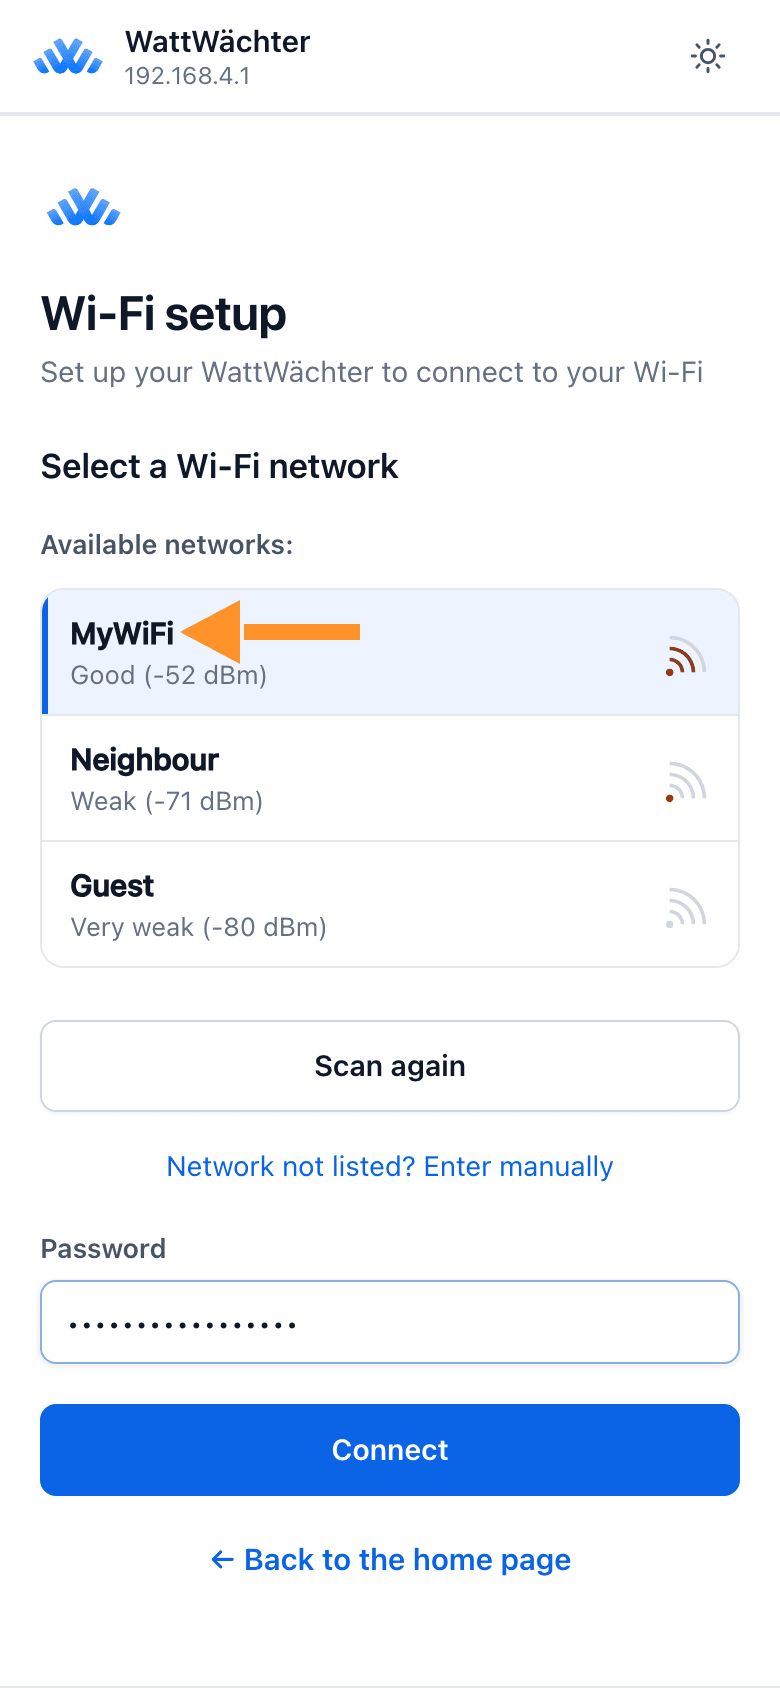
A new page with the scanned Wi-Fi networks opens. Select your home network from the list. If your network is not listed, you can also enter it manually.
-
Enter your Wi-Fi password at the bottom and click "Connect"
- The device connects to your Wi-Fi
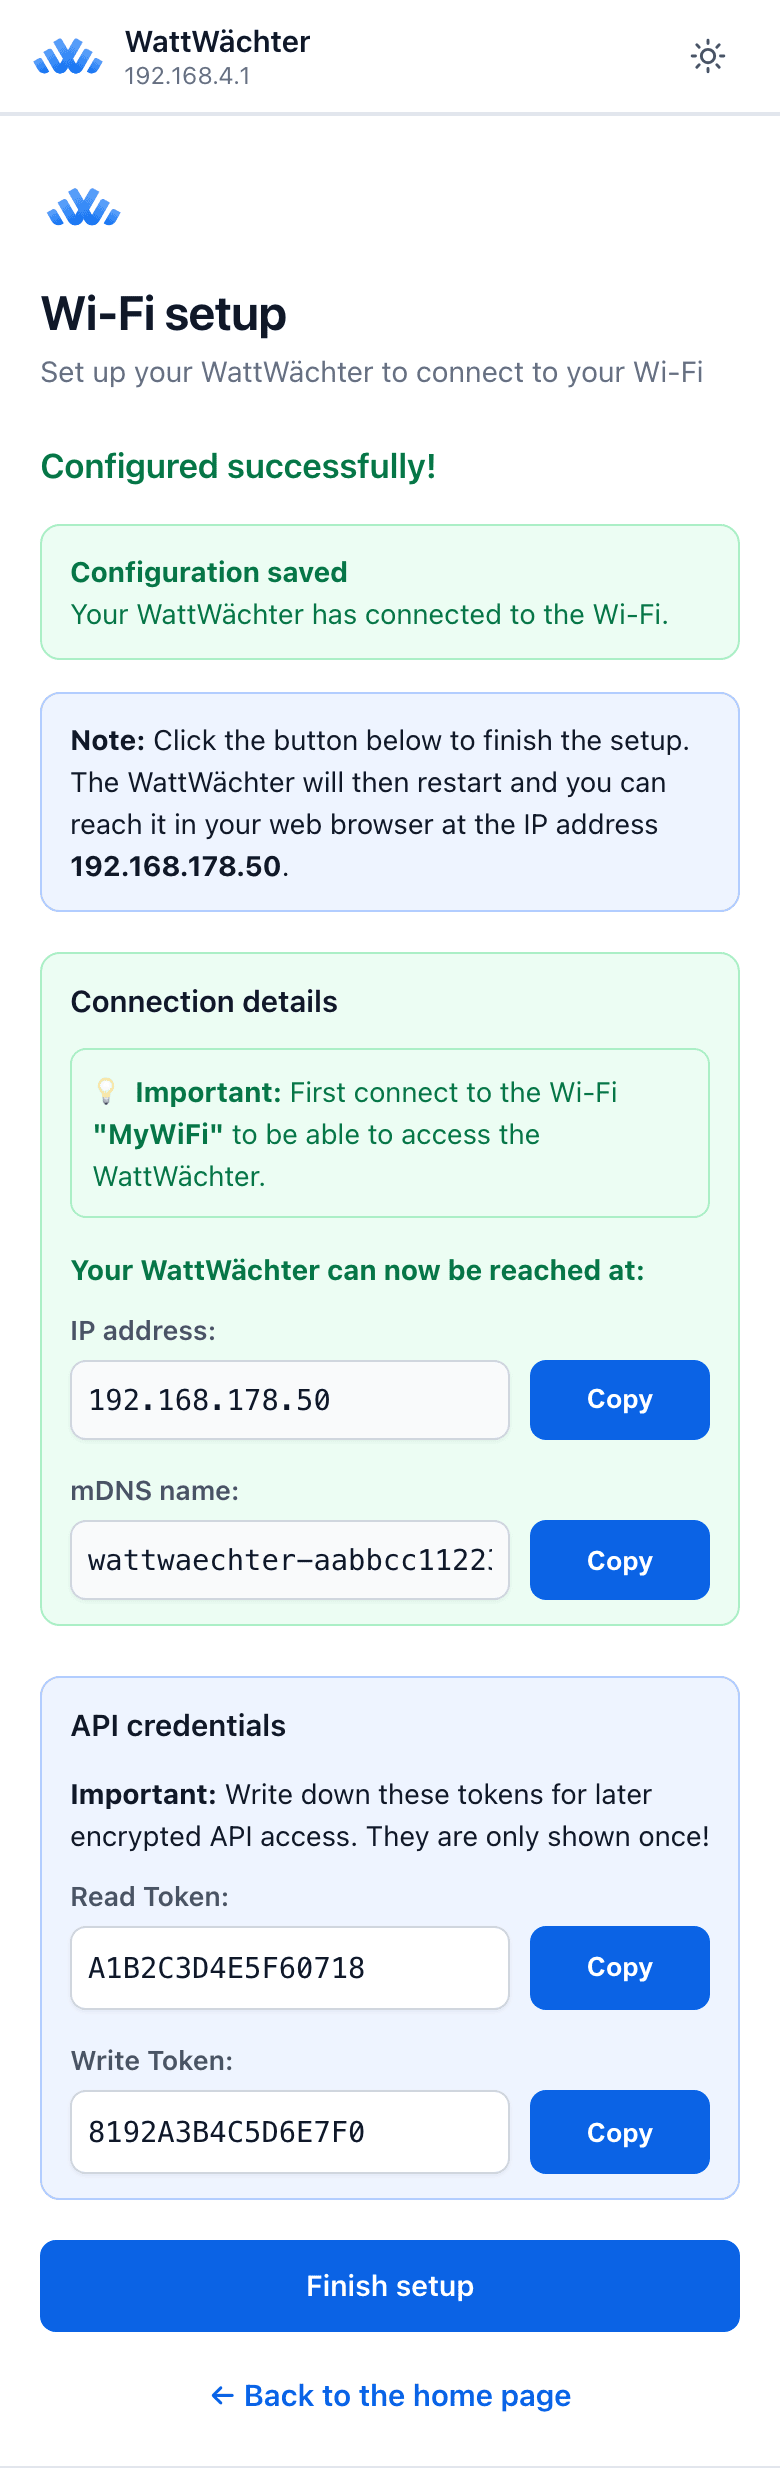
After a successful connection a confirmation page is shown. Under "Connection details" you find the IP address and the mDNS name. The API tokens are shown as well — they only matter if you later enable API authentication.
AP mode ends
After a successful connection the access point is switched off. From now on the WattWächter Gas is reachable on the Wi-Fi you entered — at its .local address (e.g. http://wattwaechter-aabbcc112233.local) or its IP address.
Test the connection
- Reconnect the device you used for the setup (e.g. your smartphone) to your normal Wi-Fi
- Enter the mDNS name or the IP address shown on the confirmation page in the browser
The web interface appears in the language selected in the settings under Time & language — German or English.
2. Mount the sensor on the meter
Mount the sensor on the meter — where the marker passes it on every revolution. Where exactly it has to sit and how to fix it is described under Meter preparation. Which mounting guide fits your meter is shown under Meter preparation → Mounting the adapter.
Check whether the sensor sits correctly in step 6 — ideally before fixing it for good.
3. Set the medium
Open the web interface and go to Settings → Gas/water meter. Under Medium select Gas and save.
The medium determines how the device labels and bills the values: gas is billed in kWh (converted with the calorific value and Z-number), water in m³. The device name in the web interface follows the medium too.
Whether the device fits your meter depends on the variant: Magnetic Field (GW-MF) if a magnet turns inside your meter, or Inductive (GW-ID) if it has a metal marker. See Supported meters.
Tariffs belong to the medium
Each tariff belongs to its medium. After switching gas ↔ water only the tariffs of the new medium count; the previous ones stay saved and apply again once you switch back. See Settings → Tariffs.
4. Enter the meter reading
Read the meter reading on your meter — with all decimal places the register shows — and enter it under Current meter reading (m³). After saving, the web interface asks you to confirm; from then on the device counts on from this value.
Later the field always shows the reading the device is currently counting. If it differs from the meter — for example after a power cut — simply enter the reading from the meter again.
Corrections are not consumption
Entering a meter reading never counts as consumption. Consumption and costs before and after the correction are still calculated correctly.
5. Volume per revolution
Under Volume per revolution (m³) enter how much gas one revolution of the last number wheel or the pointer wheel corresponds to. The value is printed on the meter, e.g. "1 rev = 0.01 m³".
| Typical | Value |
|---|---|
| Gas | 0.01 m³ |
| Water | 0.001 m³ (1 litre) |
Values from 0.0001 to 1 m³ are allowed.
If you change the value later, it only applies to the following revolutions — the reading so far is kept.
Calorific value and Z-number
Enter the calorific value (kWh/m³) and Z-number from your gas bill. Without an entry the device uses 11.0 kWh/m³ and 0.95. What the values mean and where to find them: Readings → From cubic metres to kilowatt hours.
6. Check that it counts
Switch on a gas appliance and watch the device:
- LED: On every counted revolution the LED goes dark briefly. You can see right at the meter whether it counts.
- Dashboard: The meter reading rises and the flow rate shows a value.
- Alignment aid (Magnetic Field only): Below the third tile the dashboard shows the field strength in µT (
|B| … µT). It should change while the wheel turns. With Inductive, watch the LED.
If the dashboard shows "Magnetic field sensor not reachable" or "Coil sensor (LDC) not reachable", the sensor built into the device is not working. The device retries every 10 seconds; if the message stays, see Troubleshooting.
Adjusting sensitivity or minimum amplitude
The defaults usually fit. If not, adjust them under Settings → Gas/water meter:
The sensitivity is the minimum field change in µT at which a passing magnet counts as a revolution. Default 250, allowed 10 to 5000.
- If revolutions are missed: lower the value.
- If too many are counted: raise the value.
The dashboard shows the current field strength.
The minimum amplitude is the smallest change of the coil value at which a passing marker counts as a third of a revolution. Beyond that, the threshold adapts automatically to the measured amplitude (40 % of it). Default 15, allowed 5 to 500. Noise is around 1 to 2; the marker moves the value by 20 to 250 depending on the distance.
Raise the value only if counts occur while nothing is turning.
7. Done
After a successful Wi-Fi connection the LED turns green; it goes dark briefly on every counted revolution. The WattWächter Gas is counting now. If the LED shows a different color, see LED Status.
- Local access:
http://wattwaechter-XXXXXXXXXXXX.local(the mDNS name is shown at the end of the setup in the browser) - API access:
http://wattwaechter-XXXXXXXXXXXX.local/api/v1/... - Cloud portal (optional): Remote access via login.wattwächter.de — setup guide
Local Operation
The cloud connection is optional. The WattWächter Gas works fully locally — all data is accessible on your home network via the mDNS name.
Next step: FAQ — counting, alignment, factory reset