Settings
Most device settings can be changed via four different paths:
- Web interface — Local UI directly on the device, reachable at
http://wattwaechter-XXXXXXXXXXXX.localfrom the same network - Smartphone app — iOS & Android (the same app used for initial setup)
- Cloud Portal — Remote access via login.wattwächter.de
- REST API — Directly over HTTP, with all technical details and JSON schemas
What does XXXXXXXXXXXX mean?
The twelve X's represent your WattWächter's individual device ID (the last 12 characters of its MAC address, hexadecimal). You can find it e.g. in the Cloud Portal or in the app.
The settings page arranges the sections in four groups. On a computer they are listed in the sidebar on the left, on a smartphone as a list whose entries expand individually:
| Group | Sections |
|---|---|
| Device & meter | Device, Meter (NES/Echelon meters only), Tariffs, Time & language, Advanced |
| Network | Wi-Fi, Access point |
| Integrations | MQTT, Modbus TCP, Cloud connection |
| Security & maintenance | API security, Updates, System |
Remember to save
Changes only take effect once you press Save — on a computer the button sits below the section, on a smartphone at the bottom of the screen; Reset reloads the stored state. While something is unsaved, the bar shows "Unsaved changes" and the browser warns you before leaving the page.
Device
| Setting | Description |
|---|---|
| Device name | Free-form name (max. 31 characters) shown for the device in the app and in the Cloud Portal. The local hostname wattwaechter-XXXXXXXXXXXX.local is not affected. |
| Status LED | Turns the status LED on the device on or off |
Status LED
The multicolor status LED on the device shows the current connection and error state (see LED status). If you do not need the indicator, you can turn the LED off entirely here.
API keys: device_name, ledEnable — see REST API reference.
Meter
Firmware 1.2.1 and newer. This section appears only if the WattWächter has detected a meter of type NES/Echelon (ANSI C12.18 protocol). For SML and OBIS meters — the vast majority — it stays hidden, because it would have no function there.
These meters do not send data on their own. They only answer when asked, and to ask them the WattWächter has to log on to the meter. The password required for that — grid operators usually call it the readonly key — is issued by your metering point operator, not your electricity supplier.
→ Full instructions including how to request the key and how to troubleshoot: Reading NES Meters (ANSI C12.18).
| Setting | Description |
|---|---|
| Meter password | The password from your metering point operator, 20 characters maximum. The field is always empty for security reasons: entering a value replaces the stored password, leaving it empty keeps it unchanged. The line below the field tells you whether one is already stored. |
| User ID | The user ID used to log on to the meter. Default 2, allowed range 0 to 65535. Only change this if your metering point operator explicitly gives you a different ID. |
The password is stored encrypted on the device and is never returned by the API — you can only query whether one is stored.
Password missing?
As long as no valid password is stored, the readings stay empty. The live dashboard points this out with a yellow notice:
| Notice | Meaning |
|---|---|
| 🔑 Meter password required | The meter was detected, but no password has been stored yet |
| ⚠️ Meter password rejected | The meter rejects the stored password — check your entry, exactly as your metering point operator provided it |
Why doesn't the device read continuously?
The meter must still be able to communicate with the grid operator undisturbed. The WattWächter therefore logs off cleanly at regular intervals and takes a short quiet period once a day (at night by default, around 8 minutes). No new readings arrive during that window — this is not a fault.
Tariffs
From firmware 1.3.0. Here you enter the prices the WattWächter uses to calculate costs — for the dashboard, the app and Home Assistant. With the cloud connection enabled, the device keeps its tariffs in sync with the app and the portal, so you can manage them in any of the three places.
| Field | Description |
|---|---|
| Energy price | In ct/kWh |
| Base price | In €/month. Prorated to the day |
| Feed-in tariff | Optional, in ct/kWh |
| Valid from / until | Period of the tariff; "until" empty = open-ended |
| Tariff name / provider | Optional, for display only |
Prices change? Don't overwrite the old tariff — add a new one starting on the effective date: from its "valid from" it replaces the previous one, and costs before stay correct. The list marks today's tariff as active and past ones as expired. Up to 15 tariffs per device.
Time & language
| Setting | Description |
|---|---|
| Time zone | Chosen from the device's time zone list (default: Europe/Berlin). Determines all local times — timestamps of the history data, day and month boundaries of the statistics, the time of the nightly update check. Daylight saving time is handled automatically. |
| Language | Deutsch or English (default: German). Affects the texts the device itself generates: the labels of the readings in the API (e.g. "Active energy import" instead of "Wirkenergie Bezug") and in the entity names of the Home Assistant auto-discovery via MQTT, as well as system texts such as the uptime. The web interface appears in this language too; after you save a new language it reloads in that language. |
| NTP server | Time server for the device clock (default: pool.ntp.org). If it is unreachable, the device automatically falls back to built-in backup servers (time.nist.gov, time.google.com). On a company network without internet access, enter your internal time server here. |
Language and MQTT discovery
The entity names for Home Assistant are published when the device connects to the broker. After a language change the new names apply from the next MQTT connection (restart or reconnect); entities that already exist in Home Assistant keep the name they were given.
API keys: timezone, ntp_server, language.active; the time zone list is served by GET /api/v1/system/timezones — see REST API reference.
Advanced
| Setting | Description |
|---|---|
| Median filter (smoothing) | Filters short-lived outliers from the meter readings before they are passed on. Options: Off, 3, 5 (default), 7 or 9 values. Higher values smooth more strongly but delay the display by that many meter telegrams. The filter applies to all outputs alike — web interface, app, REST API, MQTT, Modbus and cloud. |
| CT ratio (current transformers) | Only for semi-indirect metering via current transformers, e.g. on large supplies: a 250 A / 5 A transformer gives a factor of 50. Currents, powers, energy counters and reactive energy are multiplied by this factor; voltage stays unchanged. Allowed range 1 to 10000 in steps of 0.1; default 1 (direct metering, no conversion). |
The CT ratio applies from the moment you save
Already recorded history data is not converted retroactively. Set the factor right at commissioning, otherwise the history will show a jump.
API keys: medianFilterSize, ctRatio — see REST API reference.
Wi-Fi
Connection to your home network. The WattWächter automatically connects to the stored WiFi on every boot. The badge next to the heading shows whether the connection is currently up.
There are two WiFi profiles: the primary WiFi and an optional secondary WiFi. On boot the device tries the primary network first and only falls back to the secondary one if the primary is not reachable — handy for a second network at the same site or when moving the device.
Per profile:
| Setting | Description |
|---|---|
| SSID | Name of the WiFi network (2.4 GHz) |
| Password | WiFi password (WPA2), max. 63 bytes. Leave empty to keep the stored password. A counter below the field shows the length and warns about leading or trailing whitespace — a typical artefact of pasting from mail or a password manager. |
| Static IP address | Bypasses DHCP. Only use it if your router does not hand out a reliable IP. The toggle reveals the fields IP address, Subnet mask, Gateway and DNS server (empty = the gateway is used as DNS). IP, subnet and gateway are mandatory; invalid entries are rejected on save. |
Changing the SSID without a new password
If you change the SSID but leave the password empty, saving asks for confirmation: the previously stored password is then reused for the new network. That only makes sense for fixing a typo in the SSID — a different network usually needs a different password.
Fixed IP address
If other systems reach the WattWächter by its IP address — e.g. Loxone, a PLC via Modbus TCP or a script — that address should never change. The easiest way is a DHCP reservation in your router: the router then always hands the WattWächter the same IP. The static IP address above is only needed if your router cannot do that. How to find the current IP is described in the FAQ.
API keys: wifi.primary, wifi.secondary (each with ssid, password, static_ip, ip, subnet, gateway, dns) — see REST API reference.
Access point
The device can open its own WiFi network — for setup, or when no home WiFi is available.
Without any configuration the access point behaves like this:
- If no WiFi is configured (factory state, after a factory reset), the access point is always on.
- After a cold start (power applied) it runs alongside the home WiFi for 15 minutes and shuts down if nobody connects during that time. It does not start after a software restart (e.g. the nightly update check).
| Setting | Description |
|---|---|
| Enable access point | Keeps the access point on permanently — it no longer shuts down due to inactivity |
| SSID | Name of the network. Leave empty for the automatic name WattWaechter-Plus-XXXXXX (X = last six characters of the MAC address) |
| Password protection | Secures the access point with WPA2. Without it, the network is open. |
| Password | At least 8 characters. If you enable password protection without entering a password, the web interface asks for confirmation — otherwise the access point starts unprotected. |
IP address on the access point network
On the access point's network the web interface is reachable at http://192.168.4.1 — see Setup.
API keys: accessPoint.enable, accessPoint.ssid, accessPoint.password_enable, accessPoint.password — see REST API reference.
MQTT
Sends telemetry data to an MQTT broker — for example to integrate with Home Assistant, ioBroker or other smart home systems. Disabled by default.
→ All fields (broker, port, TLS, user/password, topic prefix, publish interval, CA certificate), topic structure, payload format and Home Assistant auto-discovery are documented under Interfaces → MQTT.
Modbus TCP
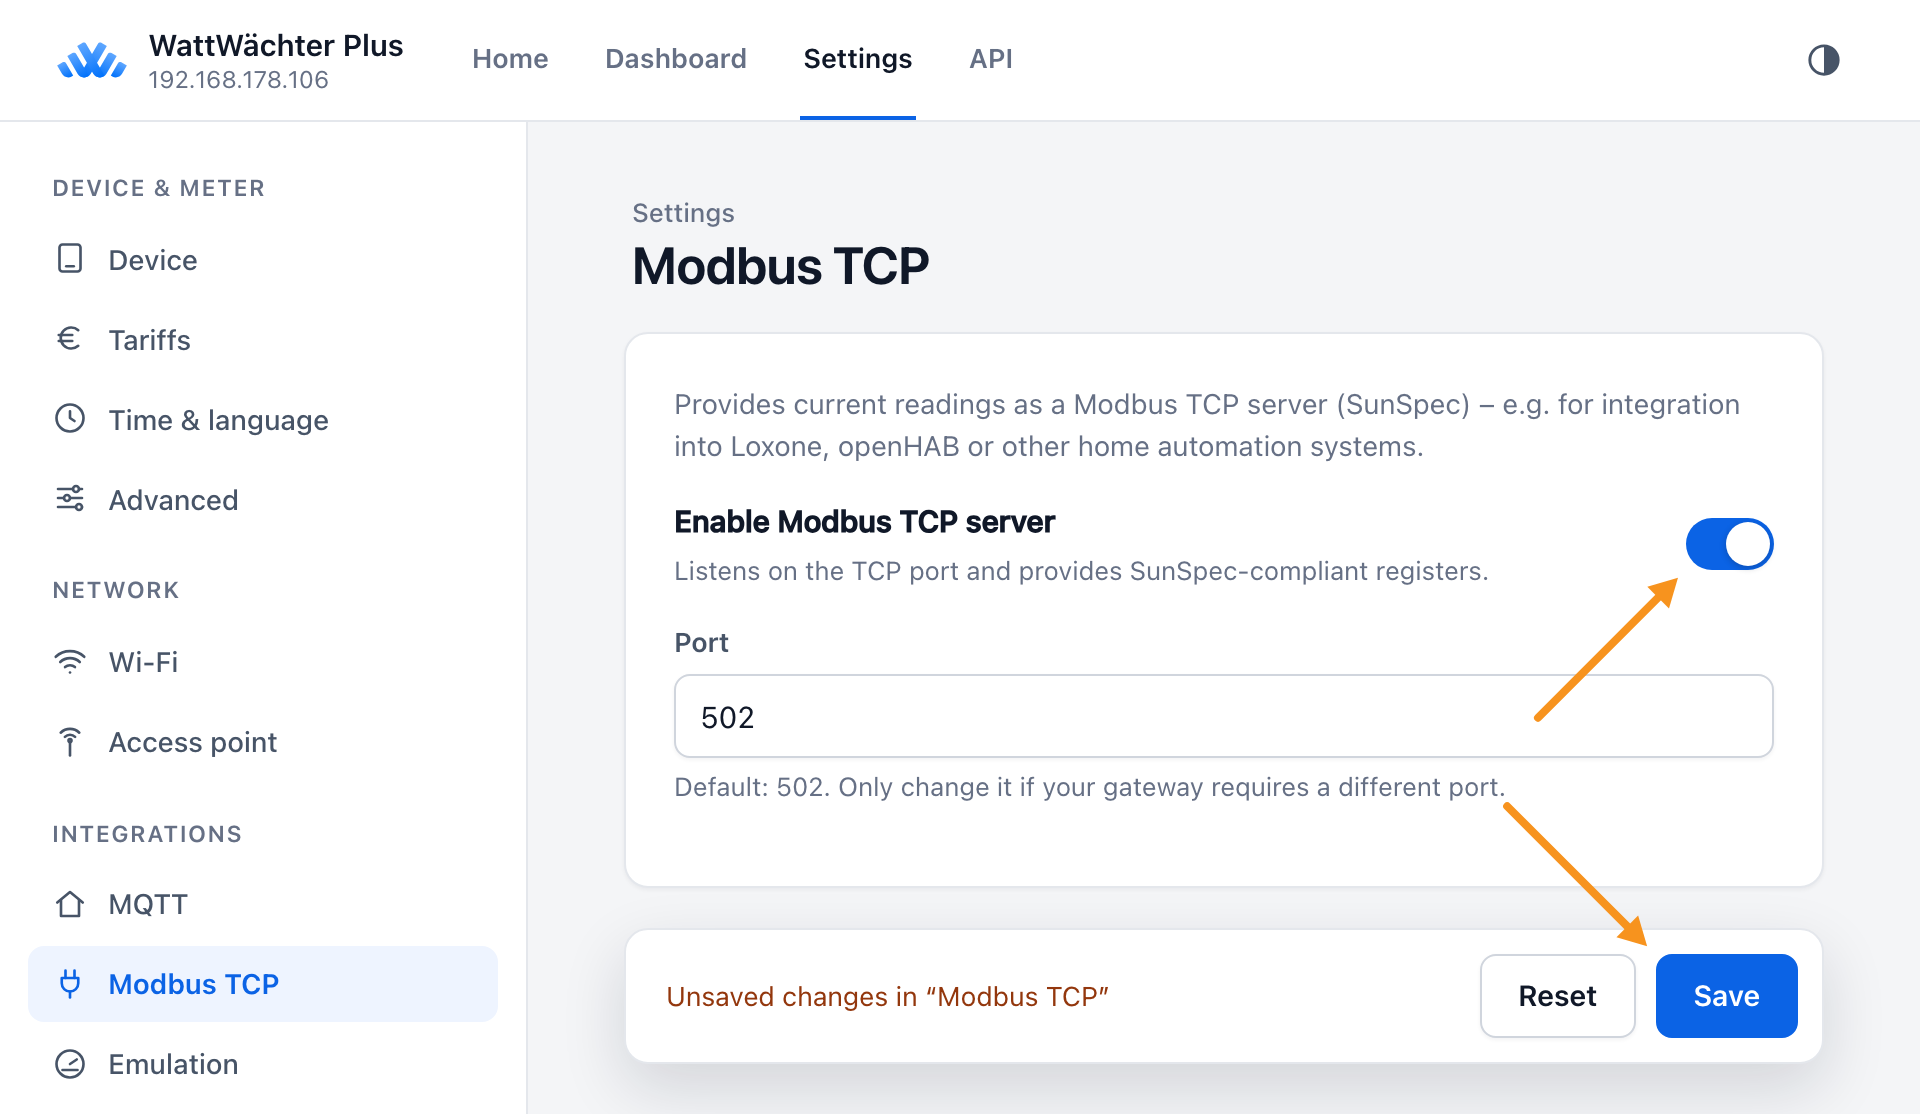
Exposes the current readings as a Modbus TCP server in SunSpec format — e.g. for Loxone, openHAB, evcc or other home automation. Disabled by default.
| Setting | Description |
|---|---|
| Enable Modbus TCP server | Starts the server; it listens on the configured TCP port and serves SunSpec-compliant registers |
| Port | Default 502 — only change it if that port is already taken |
→ Register map, data types, scale factors and example access are documented under Interfaces → Modbus TCP.
Emulation
Some devices cannot read the WattWächter Plus directly, but they can read an EcoTracker or a Shelly Pro 3EM — many batteries and inverters, for example. For them the WattWächter Plus speaks that protocol: your device then reads the values directly from your electricity meter, and no extra measuring device is needed in the distribution board. From firmware 1.3; both protocols are off by default.
| Setting | Description |
|---|---|
| Compatible with the EcoTracker protocol | For batteries and inverters that offer the EcoTracker as a meter — e.g. EcoFlow STREAM, Growatt NOAH, Hoymiles or Marstek. Select EcoTracker as the meter in the battery or its app; it finds the WattWächter via mDNS (as ecotracker-…) |
| Compatible with the Shelly Pro 3EM protocol | Only for batteries and inverters that accept no other meter, not even an EcoTracker. Select Shelly Pro 3EM as the meter in the battery; Marstek batteries find the WattWächter by UDP broadcast, others via mDNS (as shellypro3em-…) |
If your battery offers both, use EcoTracker. Both protocols at the same time also work. If the battery asks for an address, enter the IP address shown in the section — ideally give the WattWächter a fixed IP address in your router for this.
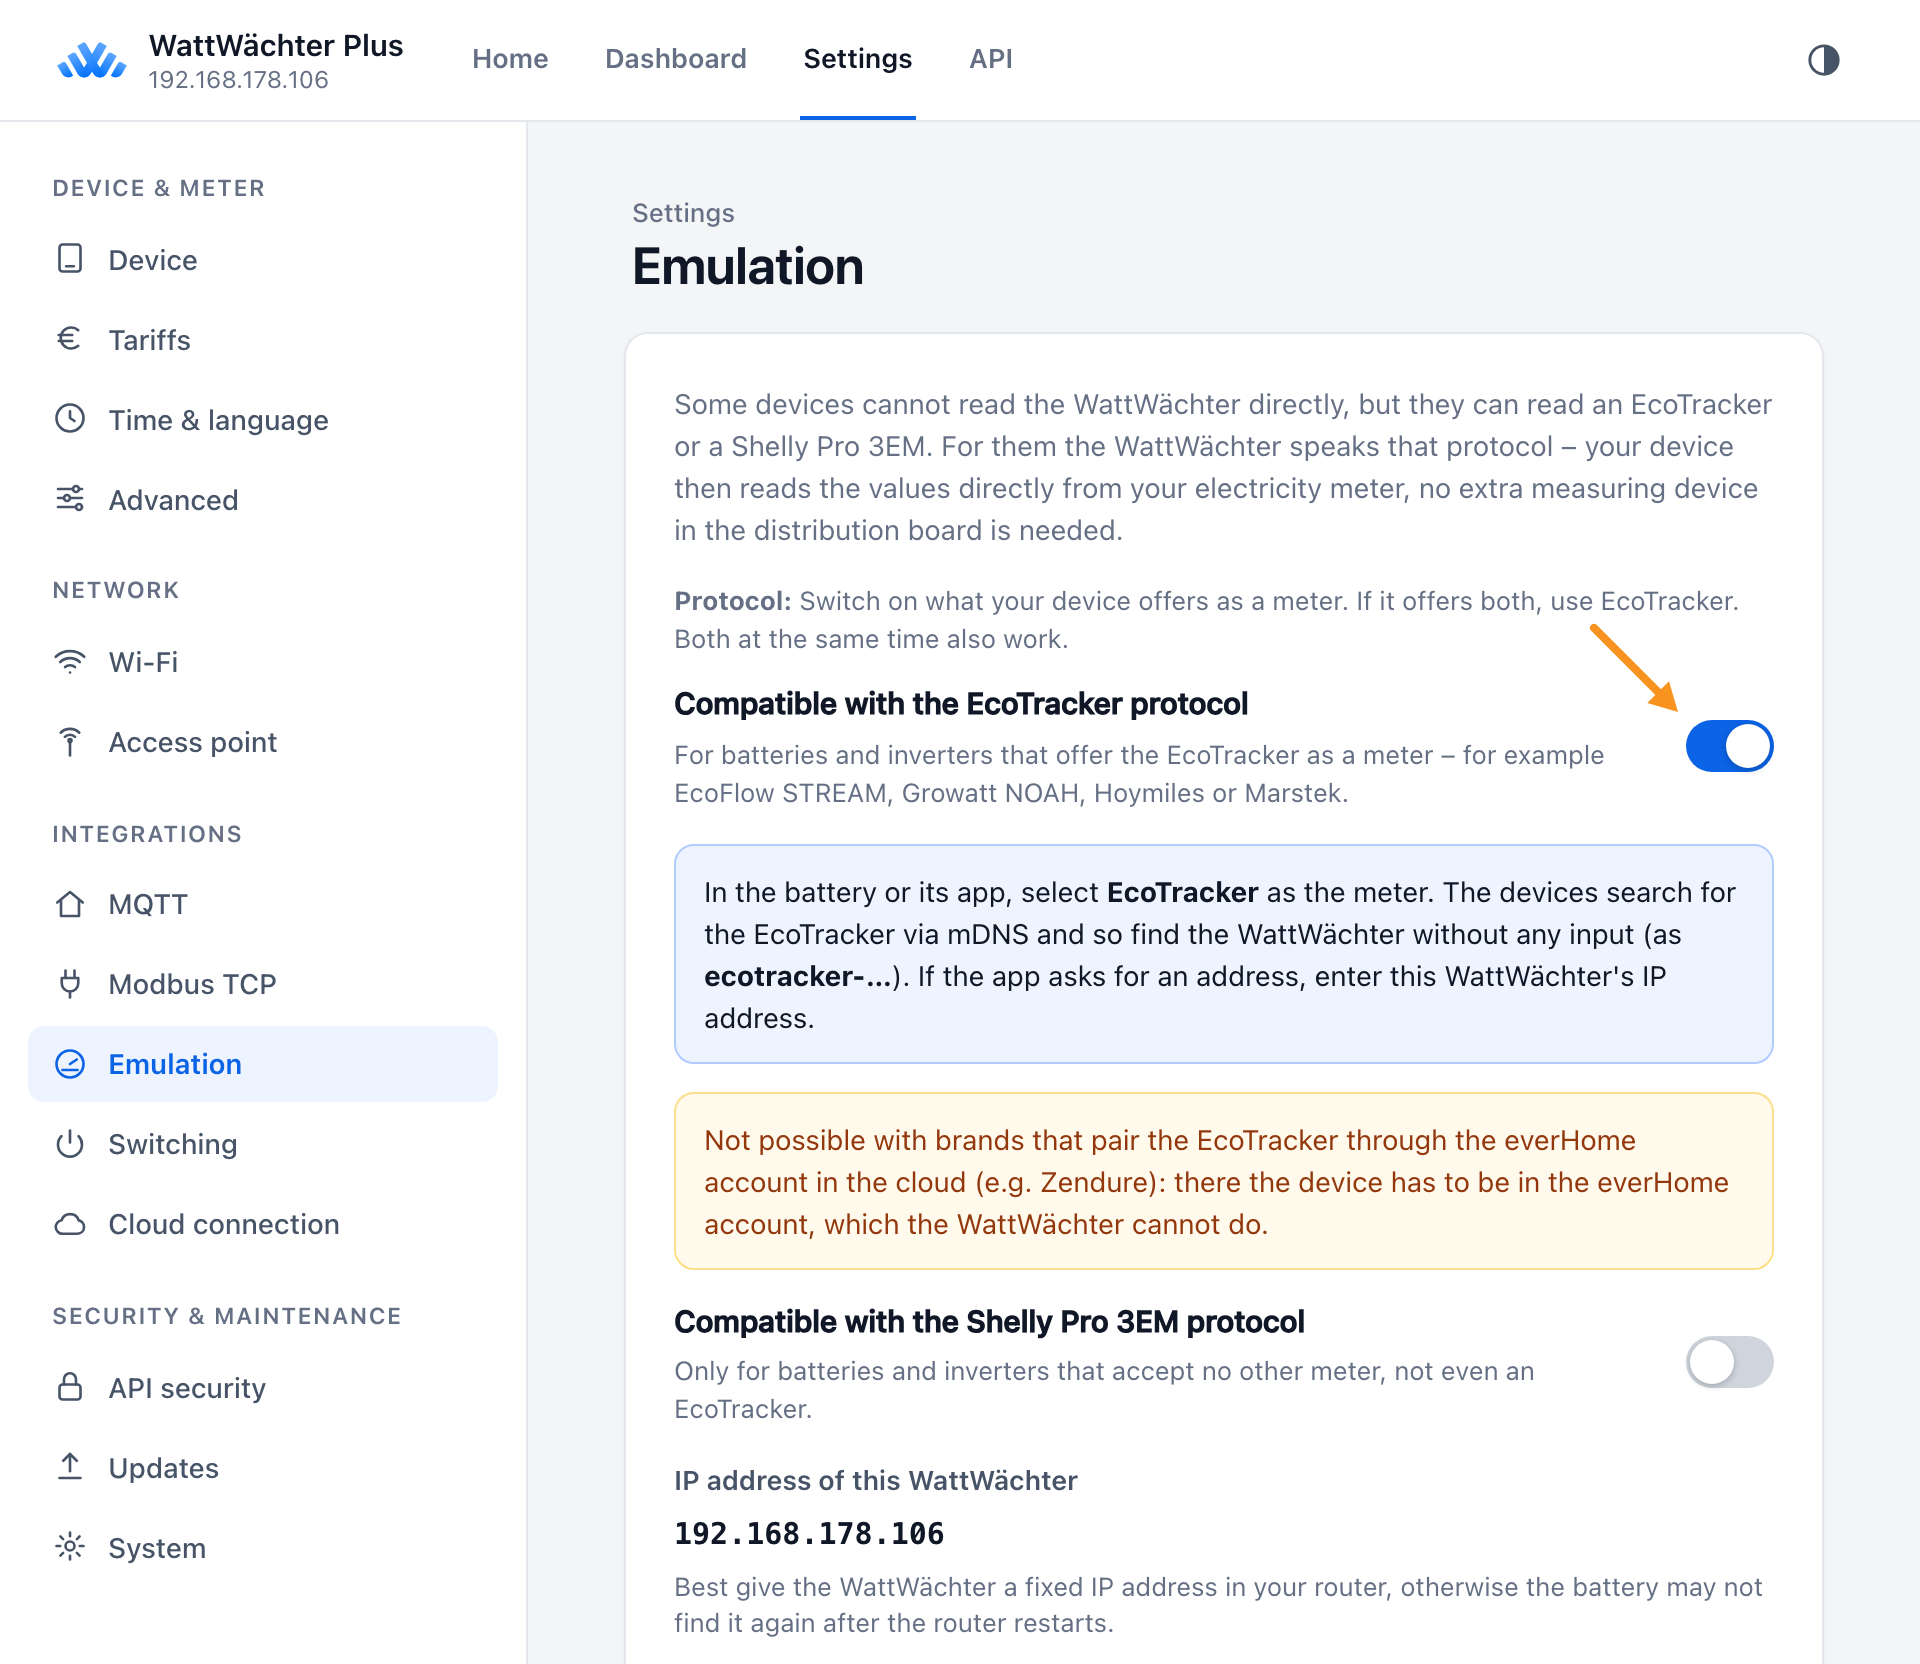
After saving, the section shows the power being delivered and, under Devices reading values, every battery that queries the WattWächter — so you can see whether the connection works.
Meters without a direction
Some meters report only the magnitude of the power, without telling import from feed-in. With these meters the WattWächter delivers no power to the battery, and the section shows a hint. The WattWächter does read the direction from the meter readings (if the import reading rises, power is imported; if the feed-in reading rises, or the import reading stands still although power flows, power is fed in). After a change, however, it is right only with the next step of the meter reading: after a few seconds at a few hundred watts, after up to half a minute close to 0 W. A battery regulates right around 0 W and would regulate the wrong way during that time. For switching rules the direction read this way is good enough, and they use it. If the meter counts import in whole kWh only, the direction stays unknown for a long time during feed-in. The calculated feed-in reading (2.8.0) is an approximation with these meters: energy from the seconds in which the direction was not yet right stays in it.
Not with cloud pairing
Emulation is not possible with brands that pair the meter through the cloud: the EcoTracker through the everHome account (e.g. Zendure), the Shelly through the Shelly Cloud (e.g. Zendure, Anker, EcoFlow).
→ API fields and examples: REST API → Emulation
Switch devices
Turns a Shelly or another device with an HTTP interface on or off — by readings, time of day or run time. For example an immersion heater as soon as there is enough surplus power. In the sidebar the section is called Switching. From firmware 1.3.
With Add rule you create up to four rules. Each rule has:
| Setting | Description |
|---|---|
| Name | Free text, e.g. "Immersion heater" |
| Device | Shelly (with Output 1–4 and IP address or name of the Shelly), Tasmota (with Output 1–8 and IP address or name of the Tasmota device) or Other device (custom URL) (one URL to switch on and one to switch off, http:// only) |
| Switch on when / Switch off when | Up to four conditions each, combined with all or any |
The conditions to choose from:
| Condition | Meaning |
|---|---|
| Reading | Surplus (feed-in) or Grid import above or below a value in watts, optionally for at least N seconds |
| Time | At, before or after a time of day, optionally only on certain weekdays |
| Time window | Between two times of day, optionally only on certain weekdays |
| Duration | Device on or off for at least N minutes |
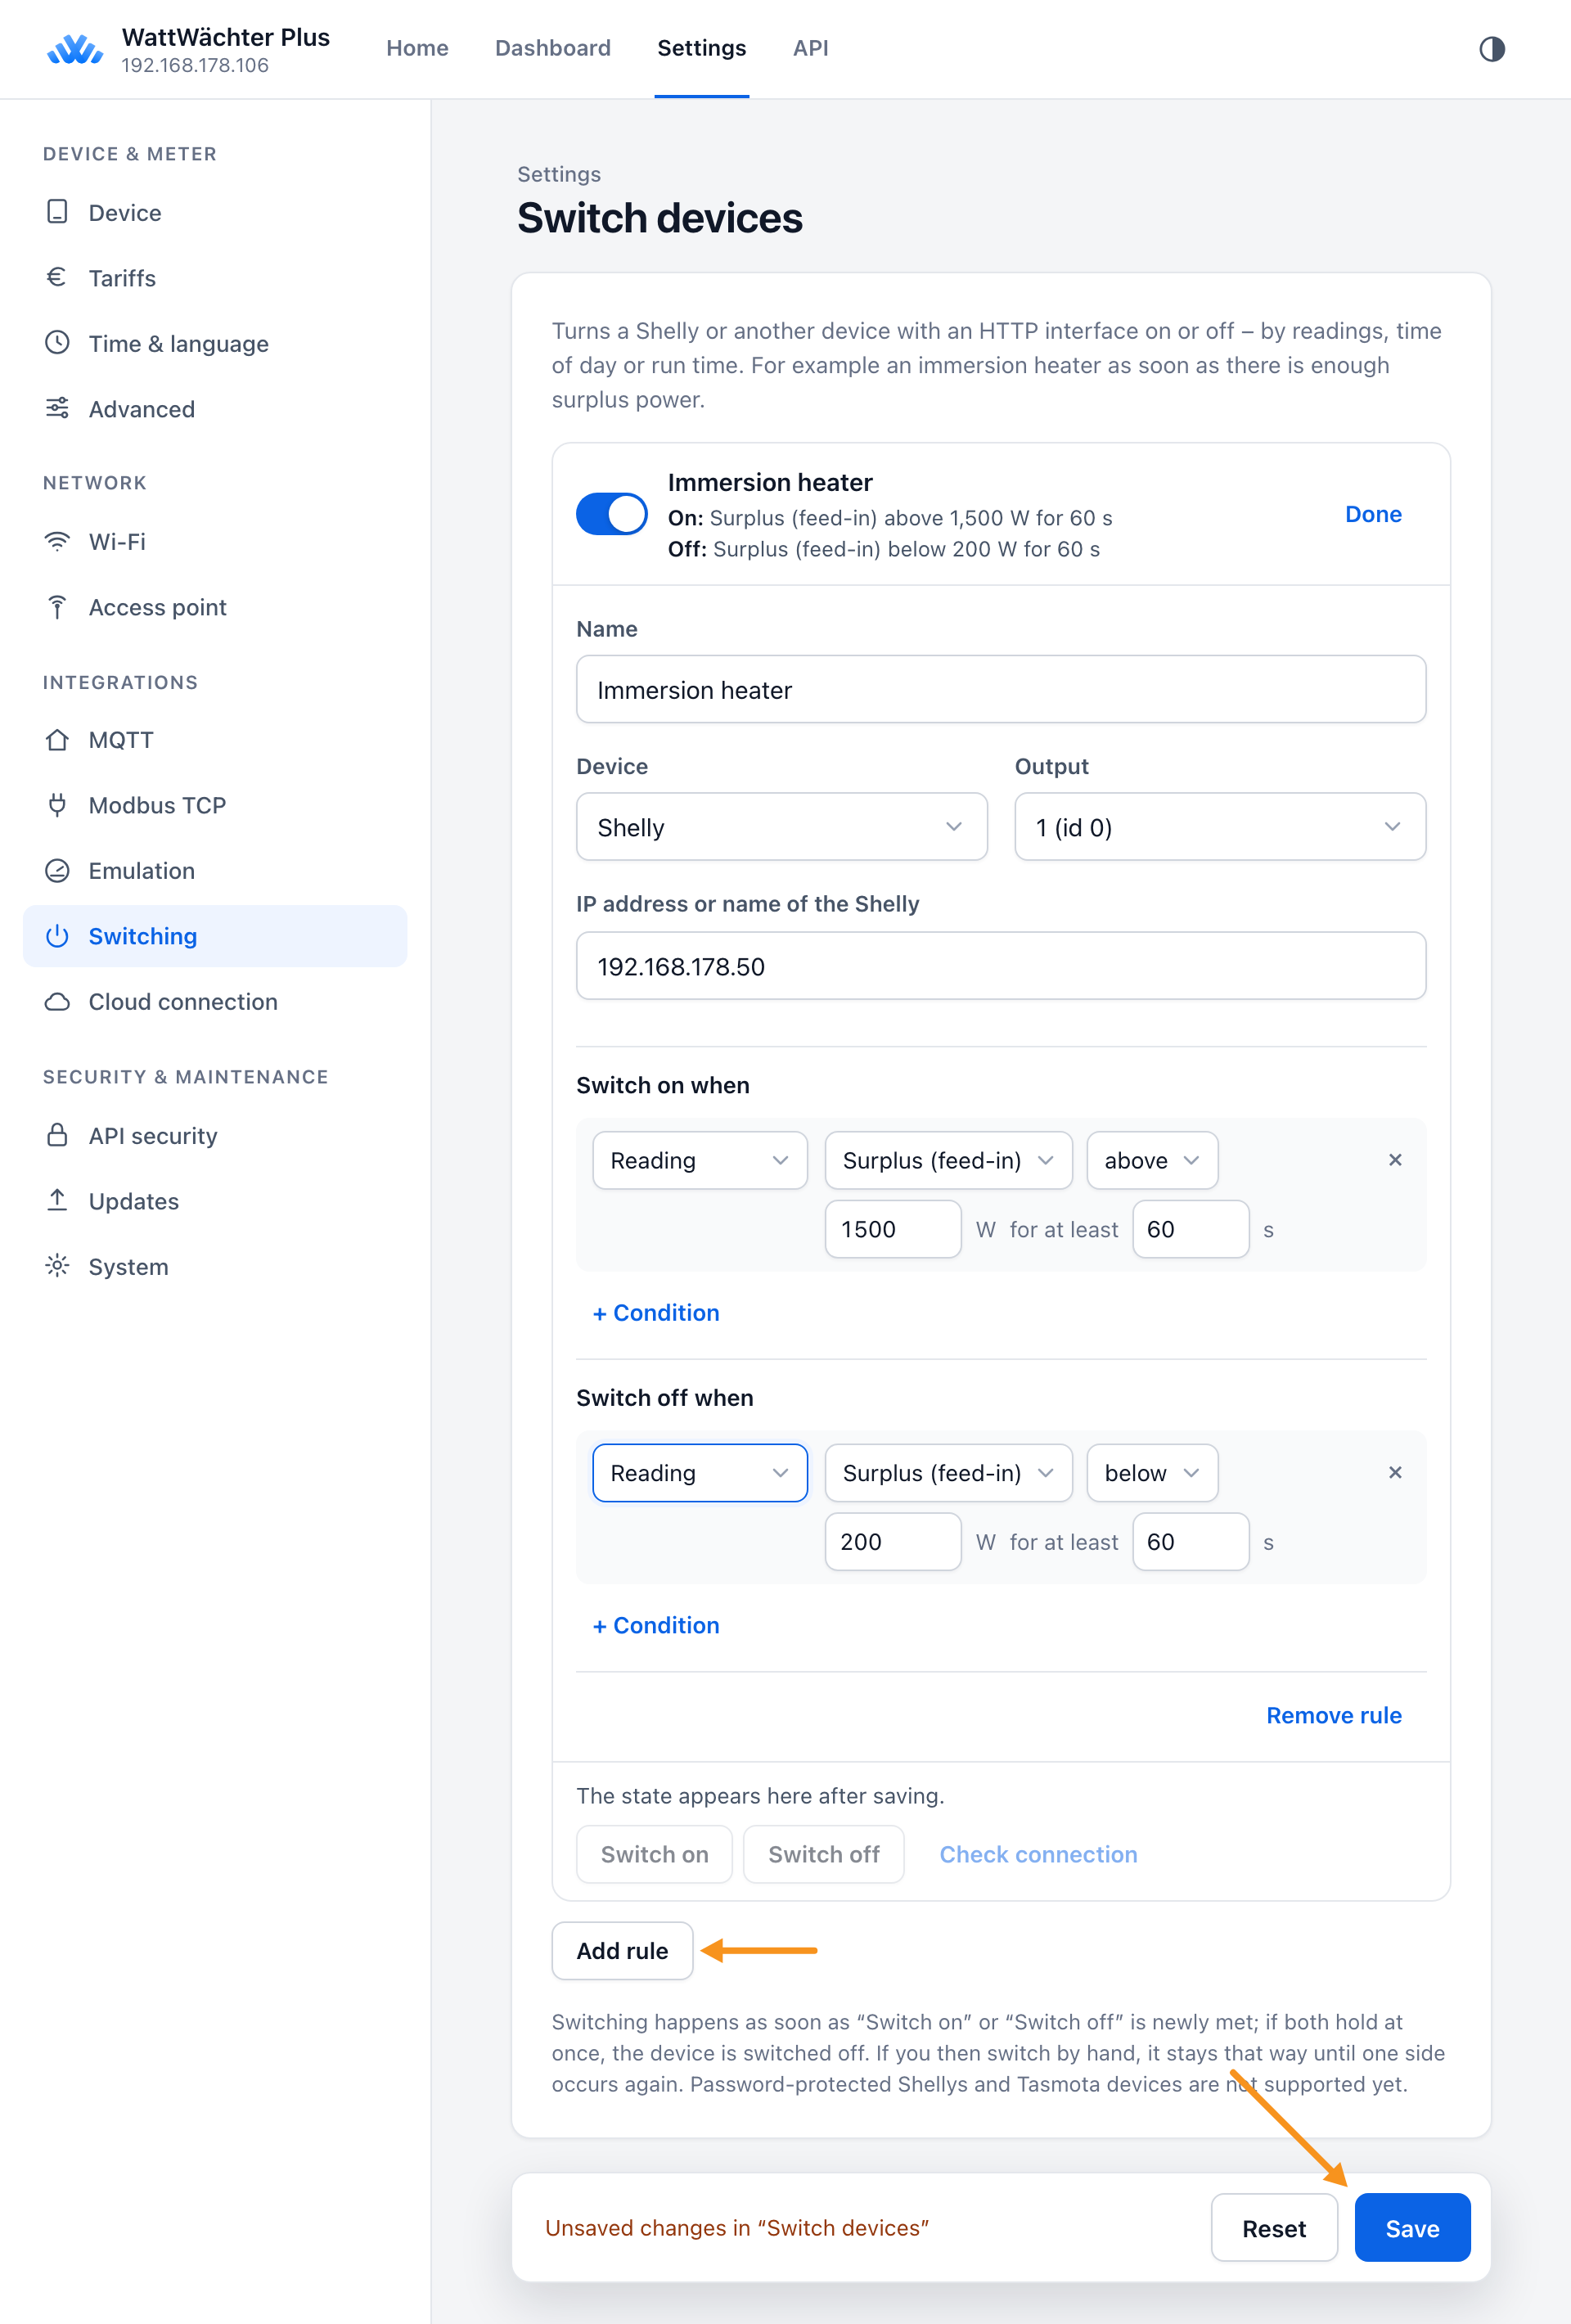
Switching happens as soon as "Switch on" or "Switch off" is newly met; if both hold at once, the device is switched off. If you then switch by hand, it stays that way until one side occurs again. After saving, each rule shows the device's state; Switch on, Switch off and Check connection let you test it by hand.
Missed time of day
A condition such as "at 06:00" holds only during that one minute. If the WattWächter misses it, it catches up on the switching for up to 15 minutes: if the device does not answer, it tries again every 30 seconds. If it was without Wi-Fi itself for a moment, it switches as soon as it is connected again — unless the device has been switched in the meantime. After 15 minutes the switch time lapses until the next time. After a power failure nothing is caught up.
Shelly and Tasmota with a password
Password-protected Shellys and Tasmota devices are not supported yet.
→ API fields and examples: REST API → Switching devices
Cloud connection
Here you connect the WattWächter to your WattWächter account, see the connection status and disconnect it again. The cloud is required for app access away from home, the Cloud Portal and remote diagnostics by support. Without it, the device works purely locally — web interface, REST API, MQTT and Modbus keep working.
The Cloud connection entry on the start page leads straight here and also shows the current status.
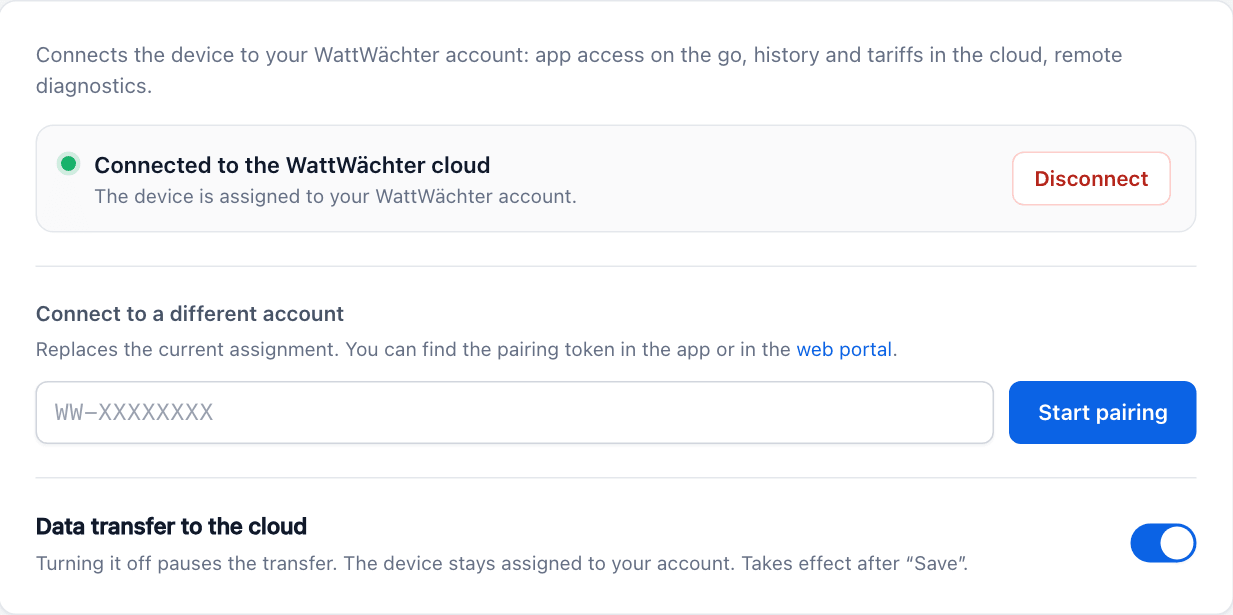
Status. The top line shows whether the device belongs to an account and is currently connected: connected to the WattWächter cloud, paired, currently not connected (e.g. no internet), paired, transfer paused or not connected to an account. If the cloud rejected a pairing, the reason is shown.
Connect to your account. Paste the pairing token (format WW-XXXXXXXX) from the app or the Cloud Portal and click Start pairing. The page waits for the cloud to confirm and reports either Connected! or why the pairing was rejected (e.g. an expired token). If the device is already paired, the field reads Connect to a different account — the previous assignment is then replaced.
Disconnect. Removes the device from your account; it then stops sending data to the cloud. As in the app, you choose what happens to your data in the cloud:
| Option | Effect |
|---|---|
| Disconnect only | The device disappears from your account; your history in the cloud is kept. |
| Disconnect and delete cloud data | Also deletes this device's history in the cloud, and its name and address in the account. Cannot be undone. |
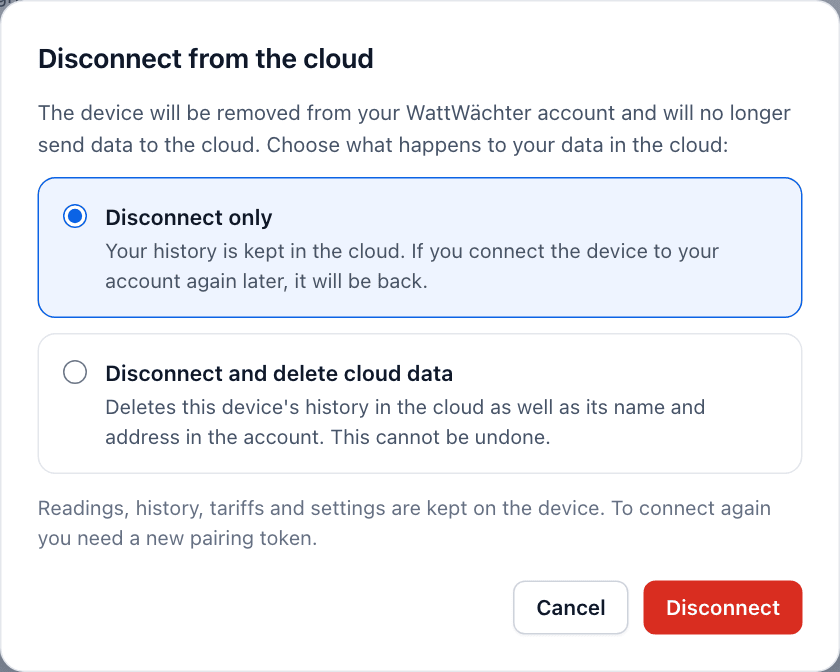
In both cases, readings, history, tariffs and settings stay on the device. To connect again, you need a new pairing token.
Device currently offline
If the device is not connected to the cloud when you disconnect, "Disconnect only" only takes effect on the device — your account keeps listing it until you remove it in the app or the portal. Cloud data can only be deleted while the device is connected; otherwise the option is greyed out.
All ways to remove a device from your account (including app, portal and REST API): Removing the device.
| Setting | Description |
|---|---|
| Data transfer to the cloud | Switching it off pauses the transfer without unpairing. Takes effect on Save. API key: awsIotEnabled — see REST API reference. |
API security
By default, the local REST API is reachable without a token to keep initial setup as simple as possible. On shared networks, we recommend enabling token-based authentication.
Independently of this, from firmware 1.3 on other web pages cannot change anything on the device from the browser unless they know the WRITE token. Details: Writing from other web pages.
| Setting | Description |
|---|---|
| API authentication required | Without a valid token, no API access is possible — this also applies to the web interface and the app on the local network, which then need the token. The settings page then asks for the WRITE token once and remembers it in this browser. |
| Regenerate tokens… | Creates new READ and WRITE tokens and shows them for copying. Only Apply (within 60 seconds) activates them and invalidates the previous ones; with Discard or after the timeout the previous tokens stay valid. Afterwards enter the new tokens wherever the local API is used (app, Home Assistant, Loxone, scripts). Technical details: Authentication. |
When enabled, there are two token levels:
- READ token — Read data (history, status, view settings)
- WRITE token — Change settings, start OTA updates, trigger reboot
Tokens are renewed via a two-phase process to prevent accidental lockout.
Recommendation
Enable authentication when the device is operated on a shared network or the REST API could be reachable by third parties.
API keys: api_auth_required (activation), /api/v1/auth/tokens/* (token rotation) — see REST API reference.
Updates
The WattWächter checks for new firmware versions every night.
| Setting | Description |
|---|---|
| Installed / Newest version | The running firmware and the newest version on the update server, plus when it was last checked. If an update is available, its date and changes ("What's new") are shown. |
| Check for updates | Asks the update server right away instead of waiting for the nightly check. |
| Update to x.y.z | Only shown when an update is available. After confirming, the device downloads the new firmware; the page shows the progress and reports when the device answers with the new version. The process takes 2–3 minutes; the device restarts several times and does not measure meanwhile. A running update cannot be cancelled. |
| Install updates automatically | With the toggle on (default), an available update is installed right away during the nightly check. Switched off, the device only reports available updates; you start the installation yourself. |
→ Update flow and troubleshooting: Updates.
API keys: autoOta; GET /api/v1/ota/check (?refresh=1 asks the server now), POST /api/v1/ota/start — see REST API reference.
System
| Action | Description |
|---|---|
| Restart | Restarts the device after confirmation. Settings and history data are preserved; the device is unreachable for about half a minute. A software restart does not open the access point — that needs a cold start or the toggle under Access point. |
A factory reset is not available from the web interface — see Factory reset.
API key: POST /api/v1/system/reboot — see REST API reference.