Raspberry Pi
The Raspberry Pi has a serial interface right on its pin header. You plug the WattWächter TTL onto it and read the meter data under /dev/serial0 without any extra hardware. This works with all models that have the 40-pin header (Raspberry Pi 2 to 5, Zero).
Prepare the meter first
For the meter to send the current power as well, it must be unlocked with the PIN from your grid operator, see Meter preparation.
1. Connect
Plug the cable into the reading head with its USB-C plug and put the four wires onto the first pins of the header. Pin 1 is in the inner row at the end of the header and has a square solder pad on the underside. The outer row along the board edge starts with pin 2 (5V).
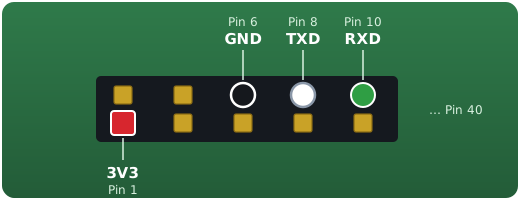
| Wire | Pin on the Raspberry Pi | Signal |
|---|---|---|
| Red | Pin 1 | 3V3 |
| Black | Pin 6 | GND |
| White (optional) | Pin 8 | GPIO14 / TXD |
| Green | Pin 10 | GPIO15 / RXD |
Only connect to 3.3 V
The TTL's data line carries the level of its supply. The Raspberry Pi's GPIO pins only tolerate 3.3 V. So connect the red wire to pin 1 (3V3), not to pin 2 or 4 (5V).
You only need the white wire for meters that have to be requested first (IEC 62056-21, footnote ⁴ under Supported meters). SML meters send on their own.
2. Enable the serial interface
Out of the box, the Raspberry Pi uses the serial interface for a login console. Switch it over once:
sudo raspi-config
Interface Options → Serial Port:
- "Would you like a login shell to be accessible over serial?" → No
- "Would you like the serial port hardware to be enabled?" → Yes
Then reboot:
sudo reboot
The interface is now called /dev/serial0. So that your user can open it without sudo, add it to the dialout group once and log in again:
sudo usermod -aG dialout $USER
3. Check that data arrives
Attach the head to the meter (cable pointing up). If the green LED flashes regularly, the meter is sending. This short script checks whether the data also reaches the Pi. It reads for up to 5 seconds and detects SML and D0 telegrams:
sudo apt install python3-serial
import serial

PORT = "/dev/serial0"

with serial.Serial(PORT, 9600, timeout=5) as s:
    data = s.read(512)

print(len(data), "bytes received")
text = bytes(b & 0x7F for b in data)
if b"\x1b\x1b\x1b\x1b\x01\x01\x01\x01" in data:
    print("SML telegram detected")
elif b"/" in text and b"!" in text:
    print("D0 telegram detected")
else:
    print(data[:64].hex(" "))
| Output | Meaning |
|---|---|
| SML telegram detected | All good: SML at 9600 baud. Continue with the evaluation. |
| D0 telegram detected | All good: D0 text at 9600 baud, 7E1. |
| Hex bytes only | The meter sends at a different baud rate. |
| 0 bytes | Head not positioned correctly, wires swapped, login shell over serial still active, meter not unlocked, or meter only sends on request. |
Only one program per interface
Only one program at a time can open /dev/serial0. Stop the test before your actual software accesses the head.
4. Evaluate the data
- Your own scripts: Python with
smllibreads import, export and power, for SML and D0 meters. - Ready-made software: programs such as vzlogger or the ioBroker adapter smartmeter read the TTL just like the WattWächter USB. Enter
/dev/serial0as the port there.
Troubleshooting
| Problem | Possible cause / solution |
|---|---|
/dev/serial0 does not exist |
Serial hardware not enabled in raspi-config, or no reboot after switching |
Permission denied |
User not in the dialout group, or not logged in again afterwards |
| Green LED stays dark | Red on pin 1 and black on pin 6? USB-C plug fully inserted in the head? Center the head, cable pointing up |
| LED flashes, but 0 bytes | Green on pin 10 (RXD)? Login shell over serial disabled? |
| Only meter readings, no power | Meter not unlocked, see Meter preparation |